Posted on Leave a comment

Focus on Resilient: Common Mistakes Made When Installing Sheet Vinyl

By Gary Scheidker
Technical Services Director, Taylor Adhesives

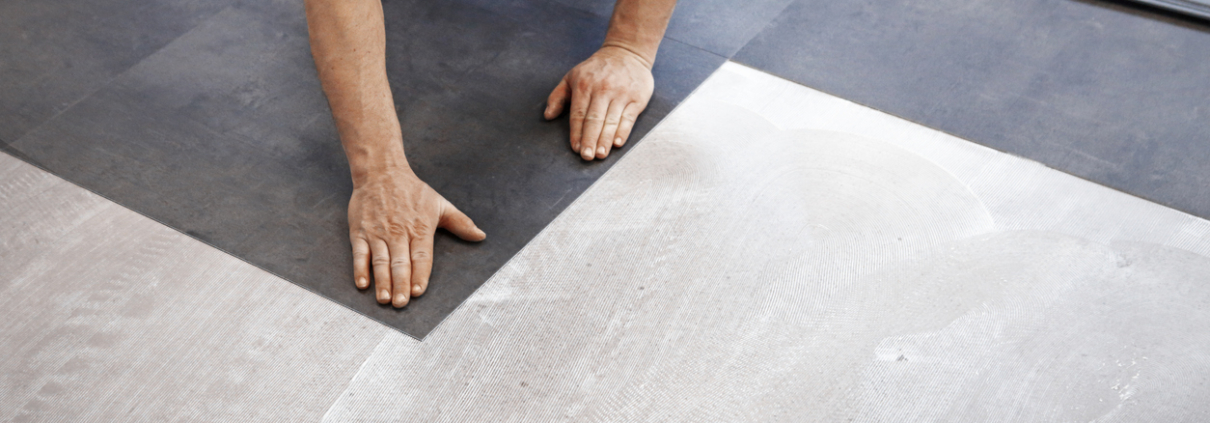
Substrate preparation is the foundation of your sheet vinyl installation, and one of the most important steps in the installation process. It does not matter what type of sheet vinyl you are installing. The result will depend on a good foundation.

  1. I have seen many floors where sheet goods were installed directly over OSB without an additional underlayment or skim coat to smooth the substrate. In these cases, I recommend installing ¼” birch plywood underlayment, and filling the joints and nail holes, to provide a smooth base for your sheet goods. If the additional thickness of the plywood will be a problem, a skim coat of high-quality Portland-based patch can provide a suitable substrate when properly applied.
  2. When installing over concrete substrates, the substrate must be clean, flat, and smooth per ASTM F710. It may require diamond grinding to remove crowns and the filling of low areas. Selecting the appropriate Portland-based patch or self-leveler is critical. You need to select a product that will withstand the substrate moisture and pH ranges. It is also critical the powder manufacturer’s instructions for water ratios and mixing are followed.
  3. Installing sheet vinyl directly over old adhesive residue is always a bad idea. If you are installing vinyl-backed sheet goods, the plasticizers in the backing can attack non-plasticizer-resistant adhesives such as clear, thin spread, latex, and cutback. It is always best to remove these old adhesives since the new adhesive is only as good as what it is stuck to.

Moisture and pH testing must be performed when installing resilient flooring over concrete and gypcrete substrates.

  1. Most flooring and adhesive manufacturers only recognize ASTM F1869 or ASTM F2170 when moisture-testing concrete substrates.
  2. Testing is only valid if the space is fully enclosed and under HVAC control for a minimum of 72 hours prior to placing the tests. 
  3. When you test a concrete substrate, you must also consider the age of the slab.
  4. High RH or MVER readings in an older slab indicate moisture intrusion from an external source. Moisture intrusion from below indicates the under-slab vapor retarder may be missing or has been compromised.
  5. You should also consider the grade of the slab since below-grade slabs can potentially be subject to a hydrostatic head.
  6. Gypcrete substrates can generally be moisture-tested using a pin meter with a gypsum setting. Most gypcrete manufacturers require the substrate to be at 5% or below prior to installing resilient flooring.
  7. Excessive moisture and high or low pH can attack the flooring and the adhesive.
  8. Before starting any installation, please know the moisture and pH limitations of all the products you are installing including patch, underlayment, adhesives and flooring.

I have seen too many failures that could have been prevented with proper acclimation. This step is critical for resilient flooring products since they are typically thermal reactive. Many installers erroneously think flooring can be acclimated anywhere in the building it is being installed in, and only requires one day.

  1. Acclimation must be performed in the room where the flooring is being installed, and the space must be under HVAC control at service temperature.
  2. The service temperature is the temperature which the space will be maintained when occupied.
  3. The acclimation is complete when the flooring reaches equilibrium with the room temperature.
  4. The acclimation period can take longer depending on the difference in temperature from the storage environment to the service temperature.
  5. Yes, the laws of physics even apply to new construction. 

Using the wrong adhesive has caused many issues over the years.

  1. Selecting the right adhesive for your flooring, and the application it is going into, is vital.
  2. Different types of vinyl sheet goods require different adhesives. Fiberglass-backed sheet goods typically call for a releasable pressure-sensitive adhesive. Felt-backed sheet goods typically call for a latex multi-purpose, epoxy, or moisture-cured adhesive, depending on site conditions and usage. Felt-backed sheet goods do not require plasticizer-resistant adhesives. Depending on site conditions and use, Homogeneous sheet goods require plasticizer-resistant adhesives such as acrylic, epoxy, or moisture-cured.
  3. If the sheet vinyl has a vinyl backing/bonding surface, the adhesive must be plasticizer-resistant.          

Since vinyl seams are never invisible, seam placement should be considered before starting the installation. Many installers place seams where they are most convenient instead of in inconspicuous locations. I have seen fill seams a few inches away from doorway seams because they were shorter than placing them along the wall on the opposite side of the room. Obviously, every installation is unique, and seam placement will vary from floor to floor.

  1. You should avoid placing seams in areas that will make them stand out.
  2. Cross-lighting can make a seam stand out and should be avoided if possible.
  3. Avoid placing seams next to each other.

Improper seam sealers and welding have also been an issue. Different sheet vinyl products require different seam sealers. You need to follow the flooring manufacturer’s installation guidelines for the proper way to seal the seams with their products.

  1. Most homogeneous sheet goods require a chemical weld or heat welding to seal the seams. This is particularly important in healthcare applications to prevent bacterial growth from developing under the flooring.
  • Fiberglass sheet goods are dimensionally stable and are typically used in residential and multifamily applications. Seam sealers for these products are generally intended to prevent moisture intrusion at the seams and do not require a chemical weld to prevent the seam from opening.
  • Heterogeneous sheet goods will typically have felt or mineral backings. Unfortunately, the vinyl face of these products can shrink over time, causing the seams to open. The proper seam sealer will chemically weld the seam, preventing the seam from opening.

I can’t tell you how often I have seen issues that could have been easily avoided by simply using kneeboards. Kneeboards are essential any time you are installing resilient flooring with a wet set or semi-wet set adhesive.

  1. Working on top of sheet vinyl installed with a wet set adhesive can cause the adhesive to displace and leave indentations or even loose bonds.
  2. Anyone installing vinyl with a reactive adhesive like epoxy, or a moisture-cured adhesive must work on top of kneeboards.
  3. Some latex and acrylic adhesives will also require a wet set or semi-wet installation method.
  4. We used to use tempered Masonite, although birch plywood, Luan or Styrofoam board will all work.
  5. The kneeboard must be large enough to cover anywhere your knees, toes, or feet will put pressure on the flooring.
  6. I recommend having enough kneeboards to be able to move around the floor without displacing adhesive.
Posted on Leave a comment

The Language of Flooring Installation, Part 2

By Seth Gladden
Director of Marketing, Meridian Adhesives Group Flooring Division and Taylor Adhesives

SUBSTRATE… According to Merriam Webster Dictionary, a “substrate” is “the base on which an organism lives” or “a substance acted upon…”. However, with its Latin prefix sub- (below) substrate refers to a layer under something else. In flooring, that layer can be concrete, wood (plywood, OSB, etc.), existing flooring materials (well-bonded vinyl products, terrazzo tile, etc.) or other surfaces that adhesives are used to bond flooring material.

Used in this context, it might be better to refer to a substrate as a foundation, since what you put on top of an adhesive is only as good as the foundation (substrate) it is bonded to. This is why substrate preparation (proper or improper) has such a massive impact on the outcome of any flooring installation. This foundational step must be given the respect and care it deserves and makes understanding the terminology behind it that much more important. For more information on proper substrate preparation, check out TAYLOR TIME LIVE – S1 E2 – “Prep for Success”. Below are some of the most frequently referenced terms regarding substrates.

  • Porous = In reference to flooring (usually concrete), porous means the substrate will absorb products (adhesives, coatings, etc.) into its surface pores (capillaries, etc.). This is a key factor for topical concrete moisture-blocking products and can also affect coverage rates and/or performance for many flooring adhesives. A simple, sixty-second waterdrop test (ASTM F3191) can be performed to check the porosity of concrete and can save you from spending extra time and money. Be cautious when dealing with porosity however as some products and manufacturers require different concrete surface profiles (see CSP below) to attain porosity.
  • Non-Porous = When dealing with flooring, a non-porous substrate does not allow absorption of products/adhesives. Although many flooring adhesives and applications allow a non-porous substrate, always check the product documentation to ensure you are using the right trowel size to avoid unwanted telegraphing, product slippage, adhesive bleed-up through joints or other related issues. It is vital to note that most concrete coatings, especially moisture-barrier products, require a porous substrate (see above).
  • Concrete Surface Profile (CSP) = A concrete surface profile (CSP), is a measurement of the surface roughness as defined by the International Concrete Repair Institute (ICRI) on a scale from 1-10 (1 being very smooth and 10 being very rough). This is determined by measuring the surface profile depth, or in other words, the distance from the top of the peaks to the bottom of the valleys in a concrete surface (when viewed as a cross-section). Often referred to as its texture, the CSP scale of 1-10 ranges from approximately 1/32” (CSP 1) to 1/4” (CSP 10) variance. Many manufacturers of topical moisture-barrier products require a certain CSP in order to achieve both a porous substrate as well as a mechanical bond.
  • ASTM F710 = Considered the gold standard in flooring substrate preparation, this ASTM was created to outline the proper way to prepare a concrete substrate to receive resilient flooring. However, this ASTM is often used by flooring adhesive manufacturers as a reference guide for all kinds of flooring substrate preparation. Some of the biggest factors called out specifically for all kinds of flooring products are the following.
    • Flat: ASTM F710 calls out that a substrate must be flat prior to an adhesive being applied and a floor covering material being installed. While this is an important part of substrate preparation, flat is often confused with level. These should not be confused as flooring adhesive manufacturers do not require a level substrate to achieve a proper bond. A flat substrate however is extremely important as it will help prevent unwanted telegraphing, hollow spots, or unsightly undulations in the finished floor.
    • Free of contaminants: This is an extremely important part of ASTM F710, especially when it comes to flooring adhesives. Due to the chemistry of most adhesives, unknown contaminants can interact with them in ways that result in flooring failures. Contaminants can come in many forms and from many sources, so knowing the history of the concrete and ensuring you have a slab free of contaminants can save you a lot of time, money and callbacks.
    • Structurally sound: This sounds easy, because let’s face it, concrete is one of the most common, and robust building materials on the planet. However, there are a lot of things that can happen to concrete that will adversely affect it. Most often, this will be more of a concern with older concrete and should be something that you pay special attention to when doing renovations or remodels, however even brand new concrete can suffer from not being structurally sound. Everything from stress fractures, cracking, crazing, spalling, pH loss, rebar corrosion, and excessive efflorescence can all signal that a concrete slab has begun to lose its structural integrity. Remember, thinking of a substrate as a foundation will help you understand the importance that this qualification plays in the success of a flooring installation.

TIME… You can’t make more of it, but you can use what you have wisely. When it comes to flooring adhesives, knowing the meaning behind the different times can help you correctly plan your jobsite and optimize it for both you and your client. It is important to note that not all flooring adhesive manufacturers use the same “time” terminology for the same things. Some terms are often used interchangeably, but they may carry different meanings, so always check the documentation, or contact that company technical support if clarification is needed.

  • Open Time = Commonly used in reference to wet-set adhesives, this is the time from adhesive being spread until you can begin installing flooring material.
  • Flash Time = Typically used in reference to dry-set adhesives, this is the time needed for an adhesive to dry-to-the-touch (no transfer to fingers) prior to flooring materials being installed.
  • Working Time = The amount of time that flooring material can effectively be installed and still meet warranted performance levels. This starts after “open time” or “flash time” depending on the adhesive.
  • Dry-Time = This is one that can be a source of confusion as some manufacturers use it to describe “flash time” and some use it to describe “cure time”. Technically, this term should refer to the amount of time it takes an adhesive to fully dry, meaning all the way through (not just the top layer), however this is sometimes hard to quantify given substrate and atmospheric conditions. This is why at TAYLOR, we do not reference “dry time” and instead rely on the other terms found here.
  • Cure Time = This is the amount of time that it takes an adhesive to be fully cured and meet the intended performance characteristics. This does not mean that the adhesive is done fully crosslinking (see Part III, next edition) as this can take much longer (days or even weeks), however it does mean that the product will perform according to all the warranted levels.
  • Pot Life = Commonly used in reference to 2-part epoxy systems, this is the amount of time a product has from when it is mixed until it sets up in the pail. Once the epoxy is out of the pail (on the substrate) it may remain viable a little longer than in the container. This is due to the heat generated by the exothermic chemical reaction when the components are combined, and when confined in the pail the heat has nowhere to escape.

As you can see, there is a lot of meaning behind each of these commonly used terms. In fact, there is far more that could be explored and understood in each of these categories, so I encourage you to continue doing your own research. Understanding exactly what you are working with will help you stay ahead of the competition, save you time and money, and achieve a better result.

Find out more …

For more information and great advice on a range of adhesives issues, visit www.TaylorAdhesives.com/TaylorTime or our YouTube channel.